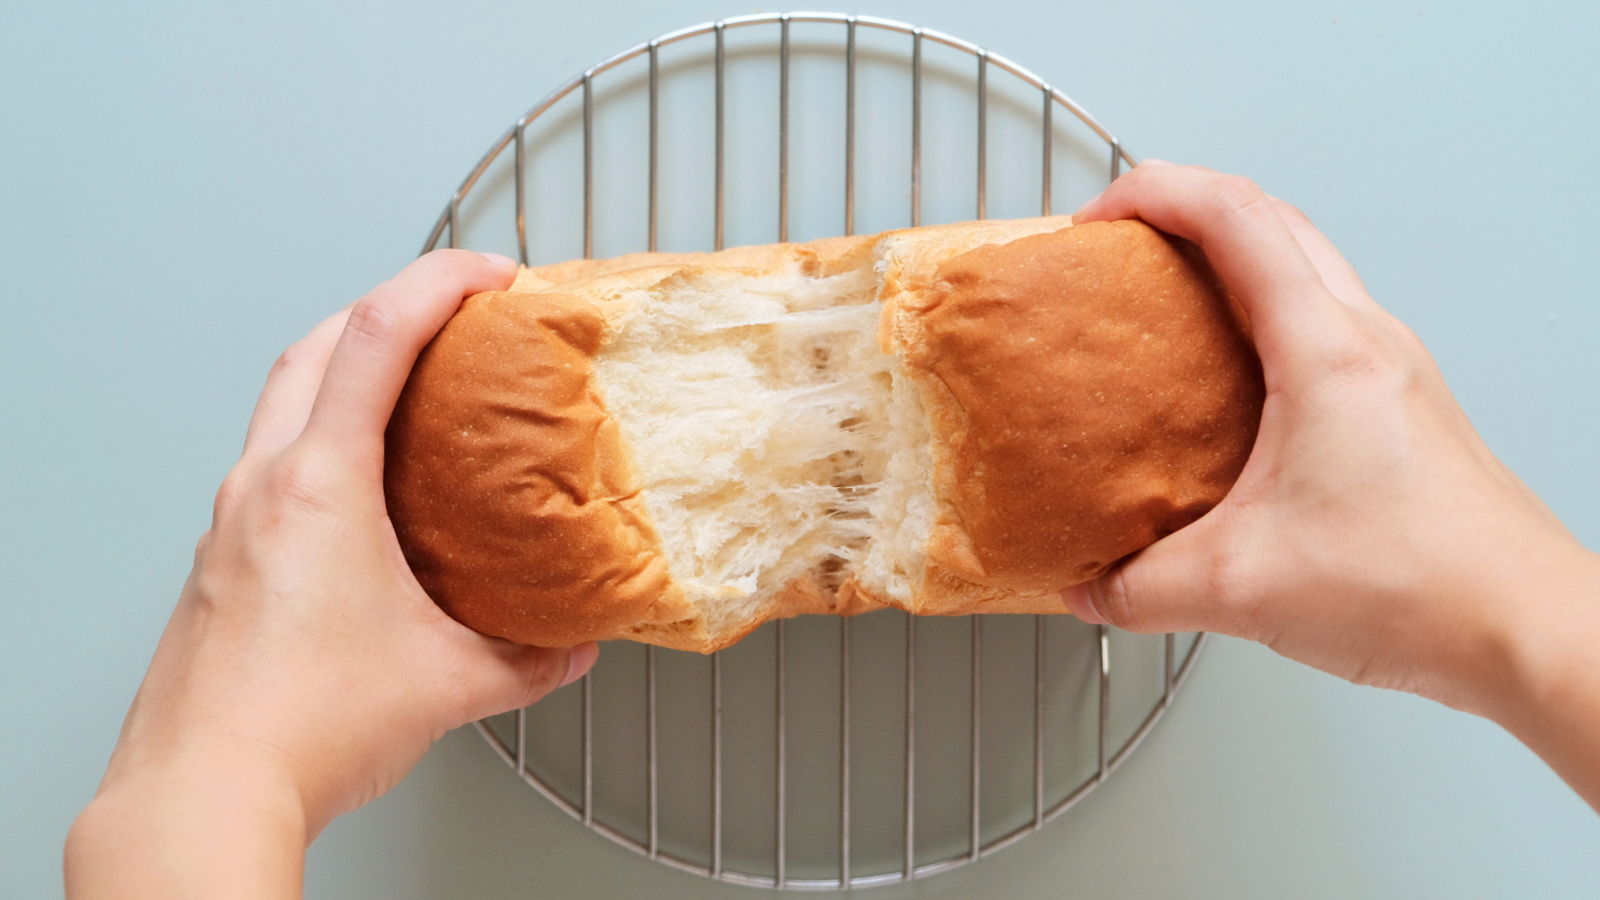

Here is a white loaf recipe which yields incredibly soft and fluffy bread. Sometimes referred to as the Japanese milk toast bread, it is praised for its sponginess. This is the type of loaf one would normally find at Asian bakeries. You will notice that the bread does not separate into chunks. Instead, there are thin layers of bread that you can peel easily. It can get very addictive to peel and munch on these layers.
While many recipes require the tangzhong method, I kept this recipe simple and provided tips to ensure a soft loaf without the extra effort. The best way to enjoy it is to cut it into slices like the classic toast bread and have them either sweet or savoury. Compared to the common white loaf, this bread is much softer with a mild milky taste which makes it really yummy.

4 important tips to guarantee soft and fluffy bread
Before attempting the bread making process, you need to go through these tips to get the guaranteed light and airy texture.
1. Kneading well
Kneading the flour and liquid mixture creates gluten which is required in bread making. This elastic substance helps the dough to rise as it traps the gas created during the fermentation process. It is needed to create spongy and soft bread. Do the windowpane check by pinching some dough and stretching it carefully. If it doesn't break easily, it is ready. You can see a photo from the coffee buns recipe. Note: Doubling the dough will take a longer time to knead.
2. Wet ingredients should be cold
Since there will be a lot of kneading, friction happens and this will then create heat. This causes the dough to get warm and activate the yeast. The dough will begin to ferment before properly developing the gluten. This is not ideal if you want a fluffy and high loaf. I strongly advise using cold butter and water. To ensure soft but cold butter, take it out of the refrigerator for about 30 minutes to soften it. As for water, use 140g of room temperature water with 20g of ice cubes.
3. High moisture creates softer bread
The more liquid used in the dough, the fluffier and softer the bread will be. However, it is pretty difficult to handle because the dough can be very sticky especially if you are kneading by hand. Therefore, gradually add more water (by 10-20g) if you think it is necessary. If it is too sticky, sprinkle some more bread flour.
In bakeries, the commercial ovens have steam injections to optimize oven spring, when the bread rises the most at the beginning of the baking process. Since we do not have this at home, spray the dough with some water before baking to keep the surface moist.
4. Salt kills yeast
Yeast will die when it comes into direct contact with salt. This will result in a poor yield. Therefore, add salt only after the gluten has developed.
Would it be possible to over-knead the dough?
Yes. However, if you are kneading by hand, it might be difficult to over-knead the dough because you would be too tired. Kneading the dough for too long using a mixer can cause it to be over-knead. When that happens, the dough will break easily because the gluten created becomes too dense. Follow the steps closely and it should turn out fine.
Can all purpose flour be used?
No, as the loaf will not be high. You have to use bread flour or high protein flour, ca. 10.5 to 13% protein to have a high and properly risen bread. All purpose flour does not have a high content of protein which is important for gluten development.
Instant dry yeast vs active dry yeast
In this recipe, I used instant dry yeast which can be immediately added to the dough. Active dry yeast on the other hand needs to be hydrated first before use.
Using fresh milk or vegan milk
That is possible. I prefer to use milk powder because I can control the strength of the milk flavour better. If using fresh milk, you can directly substitute it with the recommended amount of water. The ratio for UHT milk is 1 part milk powder to 9 parts water.
It is also possible to use soy milk powder, if that is your preference.
How to know if the dough is ready after proofing?
Do the poke test! Lightly poke the proofed dough and if it springs back and leave an indent, it is ready. It should also double in size.
Must the bread be left to ‘rise’ twice?
Yes because each cycle is meant for different purposes. During the first time, the bread is left to ‘ferment’. Fermentation allows the yeast to flavour the dough. Whereas proofing is needed for the second cycle to rise the dough right after shaping and before baking.
Shaping bread
In step 4, the bread dough needs to be flattened and shaped before placing it into the pan for the second rise. Flattening the dough will burst the bigger air pockets. When rolling the dough, tuck it in tightly. Here’s a clip to show how it is done.
Tips to store milk loaf
Once the bread is done, immediately remove it from the bread mould or it will create condensation which may encourage the growth of mold. It is crucial to let it cool on a baking rack. The bread can last for up to 2 to 3 days at room temperature. However, it is highly recommended to store it in the refrigerator since no preservative is used.
Otherwise, you can also freeze sliced bread and heat them up whenever you want to enjoy some soft bread. It can be either toasted or steamed.
Bread collapsed after baking
This happens if the bread is overproofed where the gluten is weak. This causes the bread to deflate as it is not able to hold its shape. The other reason for collapsed bread is when it removed from the oven too early causing it to to be under baked.
If the surface of the bread begins to brown too quickly, you can cover it with a piece of baking paper to slow down the browning process.
Homemade bread becomes hard faster
Store-bought breads contain added preservatives and conditioners. These chemicals help the bread to last longer while containing the moisture resulting in soft bread for days.